Introduction
Follow this guide to replace the battery on a Logitech G PRO Wireless mouse.
Replacing the battery on a G PRO Wireless mouse requires removing the mouse feet. If you plan to reuse the mouse feet, you’ll need to apply heat to loosen the adhesive and remove the feet with minimal bending. Bent or torn mouse feet may require replacement feet.
For your safety, discharge the battery below 25% before disassembling your mouse. This reduces the risk of a dangerous thermal event if the battery is accidentally damaged during the repair. If your battery is swollen, take appropriate precautions.
What you need
-
-
Shift the power switch down to turn off your mouse (when the PRO Wireless label is oriented right-side up).
-
-
-
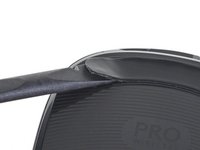
Heat an iOpener and apply it to the upper mouse foot for one minute.
-
-
-
Insert the flat end of a spudger under the upper mouse foot.
-
-
-
Slide the spudger under the length of the upper mouse foot to cut through the adhesive and detach it from the mouse.
-
-
-
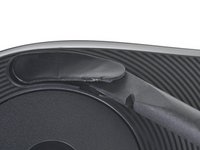
Apply the iOpener to the lower mouse feet for one minute.
-
-
-
Insert the flat end of a spudger under the left lower mouse foot.
-
-
-
-
If you're going to install replacement mouse feet or apply new adhesive, use the flat edge of a spudger to remove the remaining adhesive in the mouse foot recesses.
-
If there's any adhesive residue left, use isopropyl alcohol and a microfiber cloth to remove it. Allow the surface to completely dry.
-
-
-
Use a Phillips screwdriver to remove the seven 4.4 mm-long screws securing the lower case.
-
-
-
Lift the bottom end of the lower case about 1 cm away from the upper case.
-
-
-
Pull the lower case down about 0.5 cm to detach the lower case from the upper case.
-
-
-
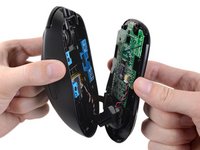
Swing the lower case left to right away from the upper case.
-
-
-
Place the lower case on your work surface.
-
Lean the upper case against a sturdy object (such as a box) to prevent straining the cables.
-
-
-
Use a pair of tweezers to firmly grip the sides of the connector and pull straight away from the socket. Hold the tweezers closer to the connector to get a better grip.
-
-
-
Use the pointed end of a spudger or your fingernail to flip up the small, hinged locking flap on the input cable ZIF connector.
-
-
-
Use a Phillips screwdriver to remove the 3.5 mm screw securing the battery plate.
-
-
-
Use the flat edge of a spudger to lift up the screw side of the battery plate and detach it from the battery.
-
-
-
Insert the flat edge of a spudger under the gap beneath the right side of the battery.
-
Lift up the spudger to detach the battery from the upper case.
-


Compare your new replacement part to the original part—you may need to transfer remaining components or remove adhesive backings from the new part before installing.
To reassemble your device, follow these instructions in reverse order.
Take your e-waste to an R2 or e-Stewards certified recycler.
Repair didn’t go as planned? Try some basic troubleshooting, or ask our Logitech G PRO Wireless Answers community for help.
Cancel: I did not complete this guide.
12 other people completed this guide.

6 Comments
Worked entirely fine for me. Since I bought replacement sliders/feet as well, I just skipped the warming up steps. The glue still separated very easily and overall took me like 10 seconds to remove all feet
Regarding the battery/flex-cable step, I personally removed the flex cable first as it’s much more fragile and less replaceable than the battery cable
I also removed the logic board to clean the area below, it’s pretty straight-forward. The only thing one has to remember is where the on/off switch colors go again during re-assembly. Answer: the blue side is at the bottom (when the PRO Wireless label is readable and NOT upside-down), you can find a photo in step 10
The symptoms I had before the repair were a bit weird, which is why I initially wasn’t sure if it’s the battery or not. Basically, my mouse wouldn’t charge a lot, but also wouldn’t work for a long time while connected via cable. Both of these appear to be fixed now (I’ll try to remember to update this comment if it turns out to be broken)
For a replacement battery, I managed to find an original battery on eBay that was disassembled from a returned mouse. That way I could be sure I’m not going to receive some potentially dangerous knock-off version, which I didn’t want to risk.
The locking flap on the input cable ZIF connector just broke in half when I tried this teardown. Would you happen to know where I can buy a replacement, if there's any?
Anybody know of a good battery to use as a replacement? I searched a while back and couldn't find a source I was confident in.
Note to all - I'm assuming the battery must run in series with the power/data cable. So if you are having battery issues (battery not charging) and waiting for the replacement to arrive, you can remove battery re-assemble and use the mouse plugged in/switched off as if it were wired in the interim!